How to Cook on a Fire Pit: Methods, Gear and Safety
Fire pits are great for entertainment while camping or in a backyard, but we also enjoy them for cooking. Everyone has experience making some minor things such as s’mores, but there are tons of other things that can be done with even the most basic of pits.
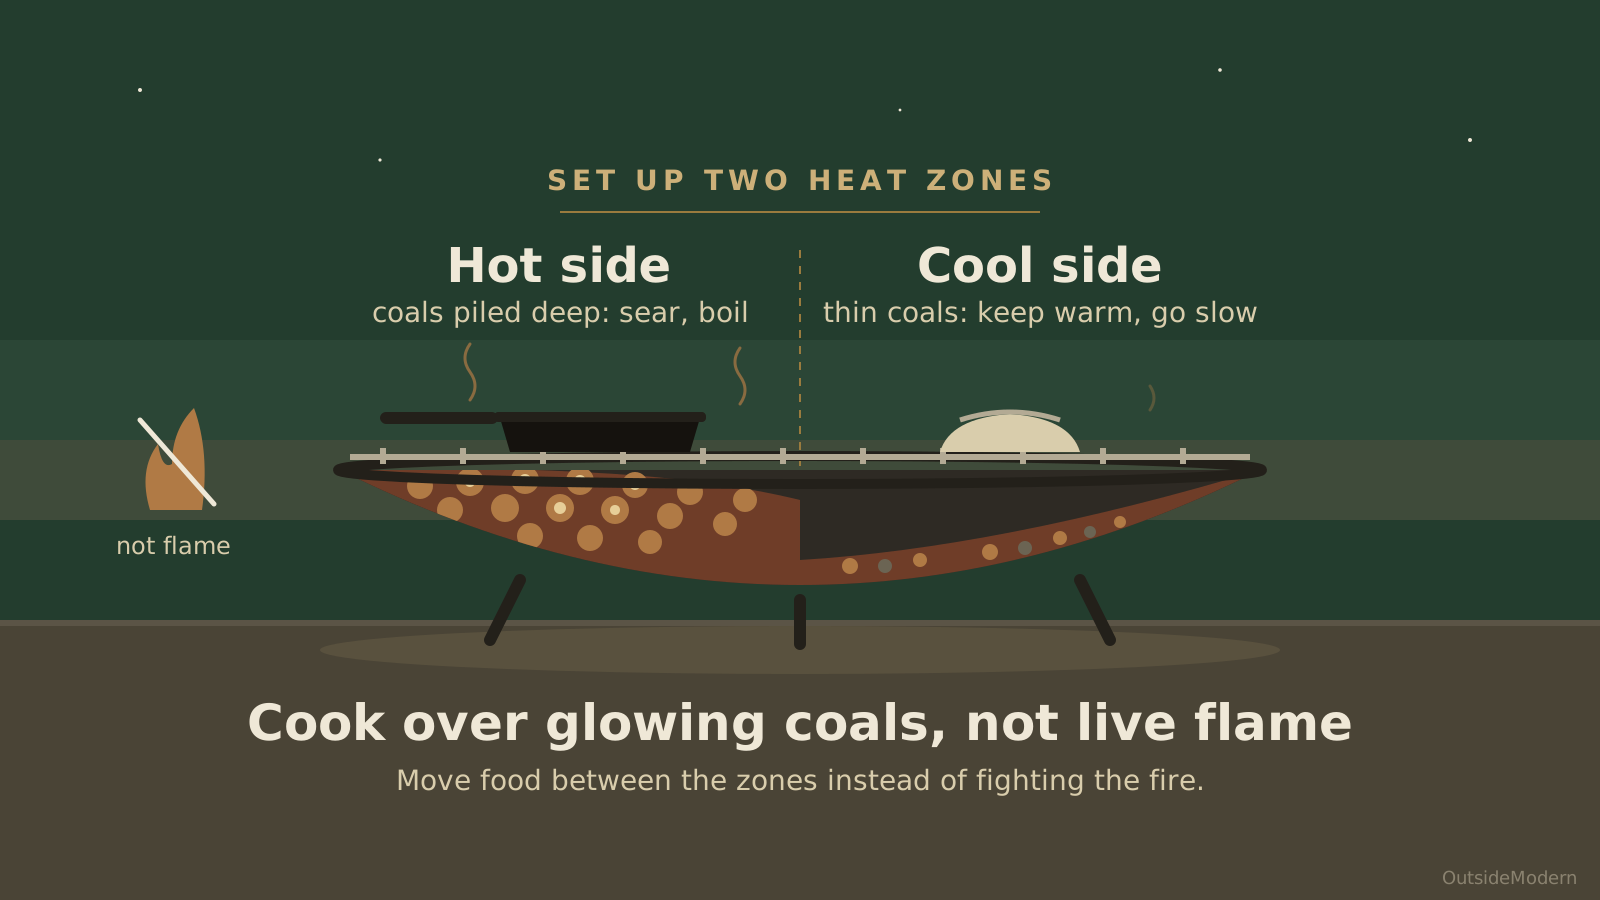
Here’s how to cook on a fire pit in short: burn seasoned hardwood down to a bed of glowing coals (about 30–60 minutes, per Breeo), rake the coals into a hot side and a cooler side, and set a grate low over the hot side for searing. Cook over glowing coals, not live yellow flame.
Depending on the type of fire pit you use, the type of wood, and the way you intend to cook, there are a variety of cooking methods available. Below we cover which fire pits you can cook on, how to build a cooking fire, the main cooking methods, the gear worth owning, food safety and cleanup, plus a few fun recipe ideas for the fire pit!
What to Know Before You Cook
There are a few variables to consider when getting ready to cook on your fire pit. These include the type of fire pit you have, the wood you intend to use, safety issues, and smoke.
Which Fire Pits Can You Cook On?
There are many different styles of fire pit around, including homemade rock fire pits, rumble stone fire pits, fire bowls, copper fire pits, and other adventurous designs like the Solo Stove Bonfire. Not every one of them is meant for food, so here’s the short version. If you’re still deciding which fire pit to buy, keep these in mind.
- Wood-burning steel, cast iron and stone pits: yes. Cook on a grate or in cast iron over the coals.
- Gas and propane pits, fire tables and anything with fire glass or lava rock: generally no. Never cook over fire glass, lava rock or a gas burner unless the maker says the unit is for cooking. Check your manual before you so much as toast a marshmallow.
- Double-wall “smokeless” pits: these burn wood, and their makers sell cooking tops and grates built to fit. Use the maker’s accessories, and see our notes on cooking on a Solo Stove, where grease on the finish is the main complaint.
- Copper bowls: cook on a steel grate or in cast iron set above the fire, so food never touches the copper. That goes for solid copper bowls and copper-look (painted or finished steel) bowls alike. Our copper fire pits guide explains how to tell which one you have.
- Tabletop and ethanol fire pits: never cook on a tabletop or ethanol pit. The CPSC has issued warnings about tabletop fire pits, which we cover on our tabletop and ethanol fire pit page.
If you’re planning to use a metal fire pit that is in a specific shape, it can be pretty easy to find a grate that will match your fire pit (as well as a spark screen).
Home made and custom fire pits are a bit more complicated to deal with, as the sizing is in no way standardized. Measure the inside and outside of the rim before you shop for a grate.
Types of Wood
One of the first considerations involved when using a pit is to choose the wood carefully. Seasoned hardwoods such as oak, hickory, maple and fruitwoods like cherry burn hot and clean, and each adds its own touch of flavor to the food. Aim for wood that’s well dried, under about 20% moisture, which is the guidance gardeningetc gives for cooking fires.
Many cooks avoid pine and other resinous softwoods for cooking, since the resin tends to spark and smoke and can leave an off flavor on food. Never burn treated, painted or pallet wood. The EPA’s archived Burn Wise guidance says not to burn painted, coated or pressure-treated wood, or trash.
Lump charcoal is an option, too. It builds a hot, even coal bed faster than logs in most steel, cast iron and stone wood-burning pits. Check your manual first, and never put charcoal in a gas or propane fire pit. Our pick is in the gear section below.
It’s best to keep the pinon wood away from the cooking, as the resins in the pinon will not work well for cooking. Once you’ve completed your meal, though, adding some pinon wood to the fire pit makes a wonderful scent, and many people say it helps keep the bugs away.
Safety
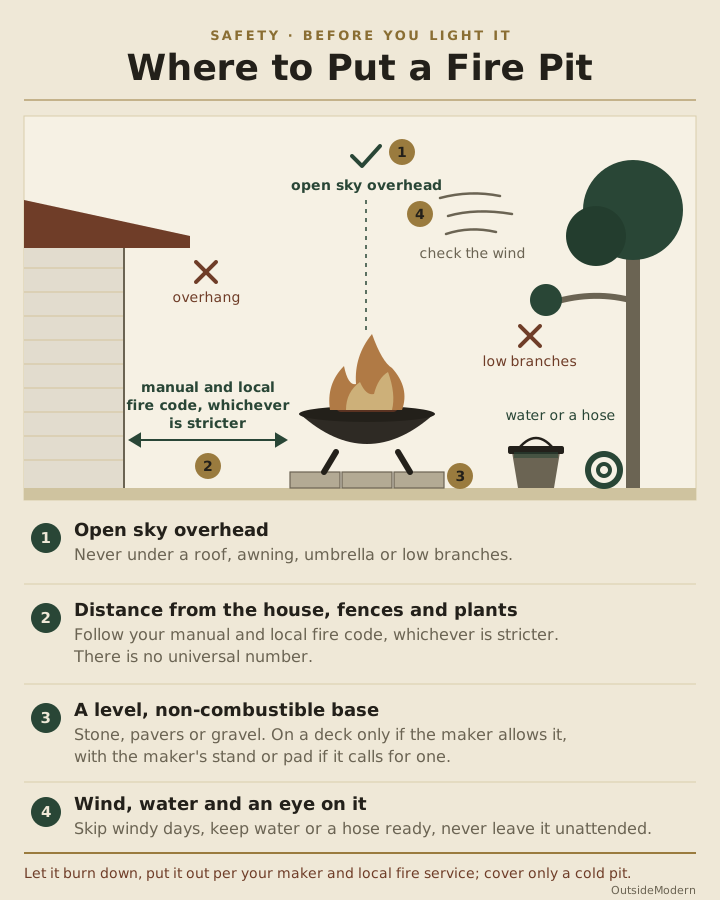
Any cook should keep water close by, a full bucket or a hose, to stop the fire from spreading in case of accidents. Wear heat-resistant gloves, keep kids and pets back, and check for local burn bans before you light up.
Where you put the pit matters most. Follow your manual and local fire code, whichever is stricter. Only use a fire pit on a deck if the maker allows it, with its stand or pad if one is required. Solo Stove, for example, says to use its stand on a deck. Our fire pit safety section covers placement in more detail.
If it’s a built-in fire pit, ring it with fire brick or dry stone. Skip rocks pulled from a river or creek: Windsor Fire & Rescue Services warns that moisture in river rock can superheat in a campfire and make the rock explode.
A spark screen can be super helpful as well, depending on your circumstances, and is definitely worth having on hand. It isn’t a cooking accessory, though. Take it off to cook, and put it back on once you’re done and sitting around the fire.
Fire Pit Smoke and Sitters
People who are worried about the smoke should try to sit away from it as much as possible. The good news is you can do more than move your chair. Dry, seasoned wood makes far less smoke than green wood, and a smaller, hotter fire with good airflow smokes less than a big smoldering pile. Sit upwind.
Double-wall “smokeless” pits help as well. They’re low-smoke once fully lit with dry, seasoned wood, not smoke-free. Our guide to how smokeless fire pits work explains the design.
If smoke is constantly a nuisance, but you love the environment that a fire pit provides, you may want to consider a chiminea. Chimineas function to channel smoke up and away, and tend to be a bit more comfortable to sit around than a fire pit.
You can cook on a chiminea, too, once the fire burns down to coals. Our guide to cooking in a chiminea covers the fuel, tools and safety steps.
Build a Cooking Fire
The biggest mistake new fire pit cooks make is putting food on too soon. Here’s how to cook on a fire pit in five steps:
- Light a fire of dry, seasoned hardwood (or lump charcoal in a chimney starter). No lighter fluid or gasoline.
- Wait for coals, about 30–60 minutes, until the flames die back and the coals glow.
- Rake the coals into two heat zones: a deep hot side and a thin cool side.
- Set your grate or cookware over the coals, at the right height for what you’re cooking.
- Cook, move food between zones, and check doneness with a thermometer.
Wait for Coals
Patience is the whole trick. Breeo suggests letting the fire burn for 30–60 minutes before you cook, and gardeningetc puts it at about 45 minutes. You’re waiting for the flames to die down and the wood to break into glowing coals.
Cook over glowing coals, not live yellow flame. Flames are uneven, they char the outside before the inside cooks, and they leave soot on food. If you add more wood, give it time to burn down before you go back to cooking.
Make Two Heat Zones
Use a long poker or shovel to rake most of the coals to one side of the pit. That deep pile is your hot side for searing steaks, burgers and anything you want crusty. The thin layer on the other side is your cool side, for slower cooking, foil packets, keeping food warm and dodging flare-ups.
Two zones give you control. If something is browning too fast, slide it to the cool side. If a flare-up starts, move the food away from the flame.
Set the Grate Height
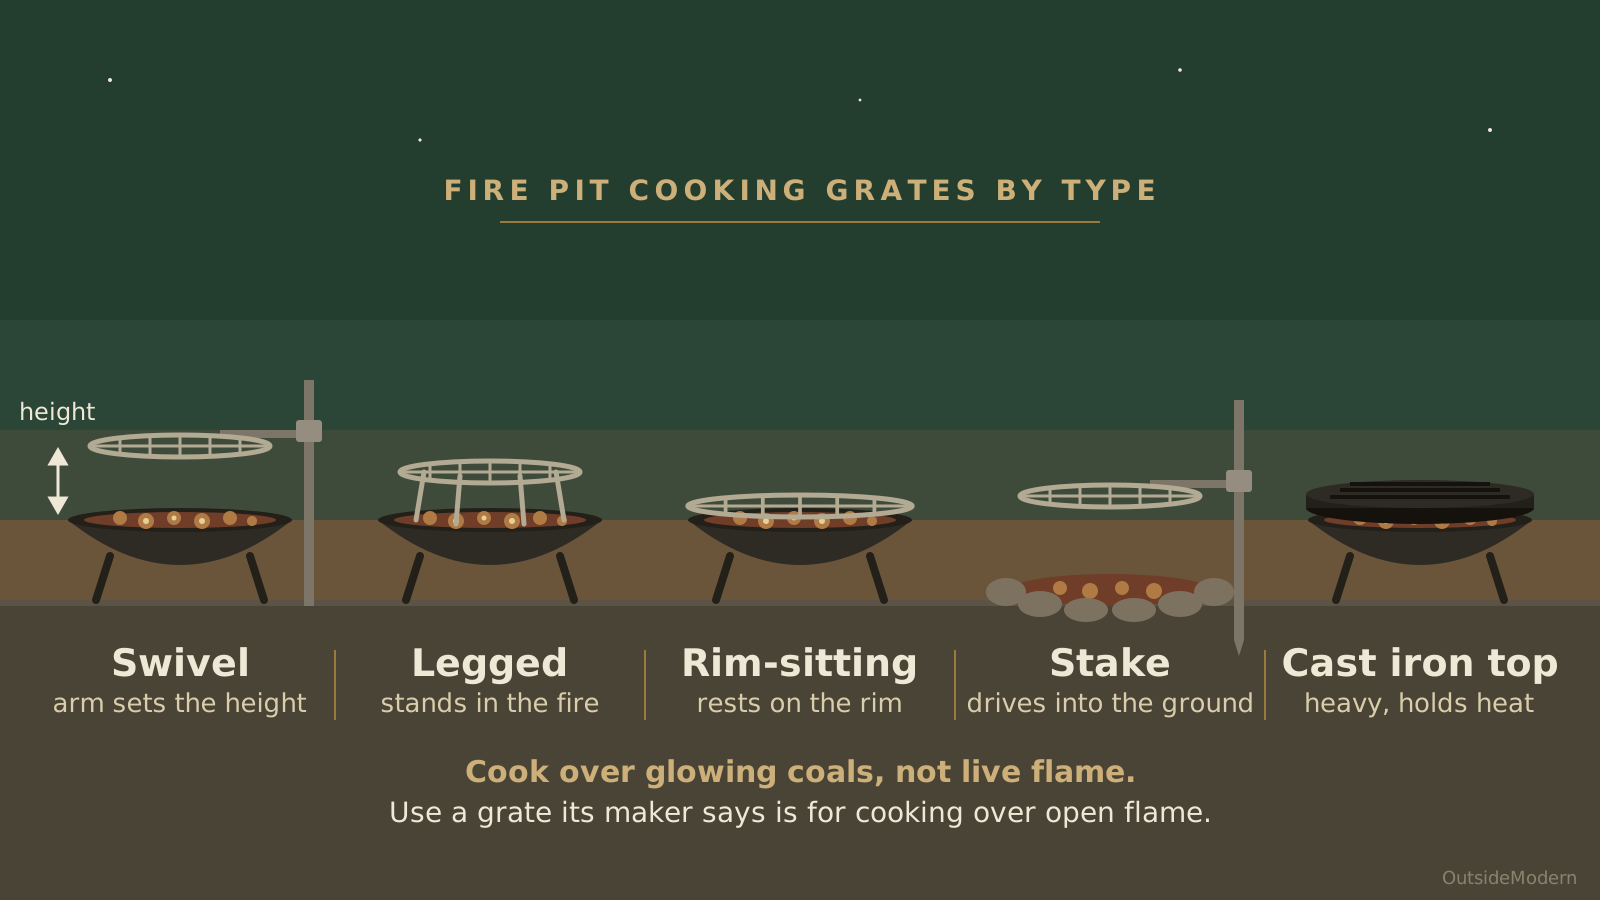
As a rule of thumb, a grate about 4–6 inches above the coals is right for searing, and somewhere higher, around 10–12 inches, suits slower cooking. That’s the consensus of cooking guides, not a hard rule, and every fire is different.
Swivel and swing-arm grills let you raise and lower the grate. Many grates have fixed legs or sit on the rim, though, so you control the heat by moving coals instead: pile them deeper for more heat, spread them thinner for less. For help choosing a grate, see below.
Preheat and Oil the Grate
Set the grate over the coals for a few minutes to heat up, then brush off any old bits with a grill brush. Fold a paper towel, dip it in a high-heat cooking oil, and wipe the grate using long tongs. Food sticks far less to a hot, oiled grate.
Use a grate its maker says is for cooking over open flame. Bare steel, stainless, chrome or cast iron is the simplest choice; a few grates use a high-temperature paint their makers rate for cooking. Never cook on a surface you’ve painted yourself. Skip galvanized metal, too: even V&S Galvanizing, a hot-dip galvanizer, says galvanized steel should never be used on surfaces that meet direct flame, because overheated zinc gives off zinc oxide fumes.
Fire Pit Cooking Methods
There are two basic options: using a skewer or using a grill. Add cast iron, pie irons and foil packets, and you can cook just about anything over a fire pit. You’ll find our gear picks for each method in the next section.
Skewers and Roasting Sticks
Skewers are just long, pointed sticks. Most places sell metal ones with wooden handles to prevent burning and stop the spread of heat to your hand. Just about everything in existence can go on one!
People who have made shish kabobs know that meat, vegetables, and even fruit can be roasted on a stick over a fire. All you need to do is put the food on the skewer and hold it over the coals until it’s done, turning it as you go.
Long flat metal skewers are the best bet for kebabs, since flat skewers stop food from spinning. For kids, marshmallows and hot dogs, telescoping roasting sticks keep little hands well back from the fire. The metal gets hot end to end, so supervise kids.
Grates and Grills
Fire pit cooking grates (see our guide to pick a fire pit cooking grate) can be more fun and also a bit more work. They create a grill-like environment over your fire pit and are a really fun and practical addition to your fire pit. They come in a few styles:
- Rim-sitting grates rest on the lip of the pit.
- Fold-leg grates stand over the coals on their own legs, in a pit or a fire ring.
- Swivel stake grills mount on a stake driven into the ground beside the pit. They suit fire rings on soft soil, but on a patio or with a bowl pit, a fold-leg or rim-sitting grate fits better.
- Swing-arm grills and tripods hang a grate or pot over the fire and let you change the height.
- Pit-maker cooking tops, like the cast iron tops sold for double-wall pits. Our Solo Stove Bonfire review covers that one.
If you don’t want to have both a charcoal grill and a fire pit, you can skip the charcoal grill and just use your fire pit as a cooking system, in much the same way your grill works. You can even use charcoal in most wood-burning fire pits! Check your manual first, and never in a gas pit.
You can place whatever you want on the grate, including meats like chicken breast, hamburgers, and freshly caught fish that have been deboned and filleted.
Cast Iron Skillet and Dutch Oven
Cast iron is the most useful cookware you can bring to a fire pit. It handles fire heat, holds it, and spreads it evenly. Just remember that the whole pan, handle included, gets very hot.
Set a skillet on the grate over the hot side for searing, eggs, potatoes and skillet desserts. A camp Dutch oven is the better pot for chili, stew and cobbler. Camp Dutch ovens have legs that stand over a bed of coals and a flanged lid that holds more coals on top, so you can bake in one. Set it on a flat, raked-out bed of coals at the edge of the pit, or on a sturdy grate.
They’re heavy, so use a lid lifter for the Dutch oven lid, and wear heat gloves for brief contact only.
Pie Irons
Pie irons are a classic fire pit tool: two hinged cast iron plates on long handles that toast a sandwich or hand pie over the coals. Most cast iron pie irons need seasoning before the first use. Rome, for one, ships its pie irons unseasoned with a light wax coating that you burn off before seasoning.
To use one, butter the outside of two slices of bread, add your filling, close the iron and latch it. Hold it over the coals, not in the flames, and turn it every minute or two. Open it to check often, because the line between golden and burnt is short.
Aluminum Foil
If you don’t want to get a fire pit grate, you can always just wrap up your food in aluminum foil. It will roast inside the aluminum foil, and foods cooked this way can taste fantastic.
Aluminum foil can be used with just about every recipe, including raw meats and vegetables, and it keeps the delicious cooking juices inside. It isn’t fireproof, though. Aluminum melts at about 1,220°F (660°C), per the Royal Society of Chemistry, and glowing wood embers can run hotter than that, so use heavy-duty foil or a double layer and keep packets out of the flames.
All you need to do is put whatever you want to cook inside the foil, along with any seasonings, olive oil, etc. Then just wrap the food completely in the foil and seal.
This packet should not be put directly into the fire. Instead, set it on a grate over the coals or on a bed of coals raked out to the edge of the pit, on the cool side. Of course, if you have a fire pit cooking grill, you can place the foil right on the grill, as well.
You can use long grill tongs to turn and reposition the aluminum foil packet, and depending on cooking time, you’ll have your food done in no time.
Don’t forget those seasonings, spice rubs, olive oil, etc. for extra flavor! These can be spread along the inside of the packet or applied directly to the food for an even more delicious meal.
Fire Pit Cooking Gear
You don’t need much to cook on a fire pit, but a few tools make it easier and safer. Here’s one pick per type. We haven’t tested these hands-on; our picks rest on maker specs and owner reviews.
| Tool | What it’s for | Our pick |
|---|---|---|
| Cooking grate | Grilling over the coals | Mr. Bar-B-Q 08600YFS fold-leg grate |
| Cast iron skillet | Searing, eggs, potatoes, desserts | Lodge L8SK3 10.25 in |
| Heat gloves | Brief contact with hot grates and pans | GRILL HEAT AID gloves |
| Instant-read thermometer | Checking doneness | TempPro TP19H |
| Lump charcoal | A fast, even coal bed | FOGO 35 lb lump charcoal |
| Camp Dutch oven | Chili, stew, baking | Lodge L10DCO3 5 qt |
| Pie iron | Toasted sandwiches and hand pies | Rome 1705 square |
| Roasting sticks | Marshmallows and hot dogs | MalloMe 32 in, 5 pack |
| Long tongs | Turning food, oiling the grate | Any long (16 in or longer) locking tongs |
| Skewers | Kebabs | Long flat metal skewers |
| Swivel stake grill | Fire rings on soft ground | See our grates guide |
| Spark screen | Sitting around the fire after you cook (not for cooking) | See our spark screen guide |
Cooking Grate: Mr. Bar-B-Q 08600YFS
This is a round plated-steel grate, about 26 inches across, with raised edges and fold-down legs. Mr. Bar-B-Q says it turns a campfire or fire pit into a grill and that it fits 30–32 in fire pits, so it’s for larger pits and fire rings, not small bowls. The legs fold for storage but don’t adjust, so you control the heat by moving coals. Some owners report warping over a big fire.

Mr. Bar-B-Q 08600YFS Large Round Cooking Grate with Folding Legs, Silver
Raised edges guard food from falling into the fire
What we like
- Legs stand it over a fire ring or pit
- Raised edges keep food from falling into the fire
- Plated steel, not painted
- Folds flat for storage
Worth noting
- Legs don't adjust height
- Can warp over a big fire, per some owners
- Sized for 30–32 in pits, not small bowls
- Maker doesn't state the plating type
Want a different style or size? See our guide to pick a fire pit cooking grate.
Cast Iron Skillet: Lodge L8SK3
Lodge’s L8SK3 is the classic 10.25 in skillet. It’s made in the USA, comes seasoned with vegetable oil, and Lodge says it’s compatible with stovetop, oven, grill or campfire. It weighs 5.66 lb empty, so check that your grate sits stable before you load it. It’s backed by Lodge’s Made Right limited lifetime warranty, which covers cracking and warping, not misuse or overheating.
Lodge L8SK3 10.25-Inch Seasoned Cast Iron Skillet
A 10.25-inch cast iron skillet, seasoned with vegetable oil and made in the USA, that Lodge rates for grill and campfire use, so it can go straight onto a fire pit grate.
What we like
- Made in the USA, seasoned and ready to use
- Rated by Lodge for grill and campfire use
- Bare cast iron, no coating to melt
- Assist handle helps you lift it in gloves
Worth noting
- Heavy at 5.66 lb, and heavier with food
- Handle gets fire-hot; wear gloves
- Shallow for chili; a Dutch oven is better
- Needs drying and oiling after use, or it rusts
Heat Gloves: GRILL HEAT AID
These five-finger aramid gloves are EN407 certified, per the maker, and the listing rates them to 932°F for brief contact. Use them for lifting a grate, moving a skillet or Dutch oven lid, or turning a pie iron. They’re not for holding coals; use tongs or a poker for that. Never use them wet, since wet gloves lose their protection and steam can burn through. The cuff length isn’t published, so wear long sleeves when you lean over a bowl pit.
GRILL HEAT AID Extreme Heat Resistant BBQ Gloves
Five-finger aramid grill gloves that the maker says are EN407 certified, for brief contact with a hot fire pit grate, cast iron handles and pie irons.
What we like
- EN407 certified, per the maker
- Rated to 932°F for brief contact, per the listing
- Five fingers for working tongs, grates and pie irons
Worth noting
- Never use wet; not for liquids or steam
- Brief contact only; not for holding coals
- Cuff length isn't published
Thermometer: TempPro (formerly ThermoPro) TP19H
An instant-read thermometer is the only reliable way to know meat is done (see Food Safety below). The TP19H reads in a few seconds, has a backlit, auto-rotating screen, and TempPro rates it IP65 waterproof, so you can rinse the probe under running water. A lock button holds the reading so you can step back from the heat to read it. The 4.3 in probe puts your hand close to the coals, so pull food to the cool side before you check it. The box may say ThermoPro or TempPro since the brand’s rename.
TempPro (formerly ThermoPro) TP19H Digital Instant-Read Meat Thermometer
A folding-probe instant-read thermometer with a backlit, auto-rotating display, IP65 water resistance and a hold button, for checking food against USDA safe temperatures at the fire pit.
What we like
- Reads in a few seconds
- Backlit, auto-rotating screen is easy to read at dusk
- IP65 waterproof, per TempPro
- Lock button holds the reading away from the heat
Worth noting
- Short probe for a hot fire pit; check food on the cool side
- Box may say ThermoPro or TempPro
Lump Charcoal: FOGO Super Premium
FOGO’s 35 lb bag is extra-large hardwood lump charcoal, made with no chemicals or fillers, per the maker. Spread it lit under the hot side of your grate for a fast, even coal bed in a steel, cast iron or stone wood-burning pit. Light it with a chimney starter on a non-combustible surface, or with kindling. The XL lumps are fine in a fire pit, but a 35 lb bag is a lot if you only cook now and then. Some pit makers limit charcoal, so check your manual.

FOGO Super Premium Hardwood Lump Charcoal, Natural…
Premium Charcoal: Made exclusively from dense, Central American hardwoods, our charcoal lumps are hand-picked to ensure that only the finest pieces are packaged. This natural charcoal is made with no added ingredients.
What we like
- No chemicals or fillers, per the maker
- Burns hot and steady for searing
- Large lumps burn long, so fewer refuels
- Lights with kindling or a chimney starter
Worth noting
- A 35 lb bag is a lot for occasional cooks
- Not every fire pit maker allows charcoal; check your manual
- Never for gas or propane pits
Camp Dutch Oven: Lodge L10DCO3
Lodge’s 5 qt deep camp Dutch oven has three legs to stand over coals, a flanged lid that holds coals on top and flips over into a griddle, and a steel bail handle. It’s made in the USA, and Lodge says it’s safe for campfire and direct flame, but not for indoor use. It’s the right pot for our chili recipe. The catch is weight: it’s 12.41 lb empty, so you’ll want a lid lifter and gloves. In a steep bowl pit, rake a flat bed of coals so the legs sit level.
Lodge L10DCO3 Deep Camp Dutch Oven, 5 Quart
A 5-quart cast iron camp Dutch oven with legs to stand over coals and a flanged lid that holds more coals on top, made in the USA by Lodge and rated for campfire and direct flame.
What we like
- Legs stand over coals; flanged lid holds coals on top
- Lid flips into a griddle
- Made in the USA, seasoned with vegetable oil
- Lodge rates it for campfire and direct flame
Worth noting
- Heavy at 12.41 lb empty; needs a lid lifter and gloves
- Legs won't sit on an indoor stove
- Hand wash, dry and oil after every use
Pie Iron: Rome 1705
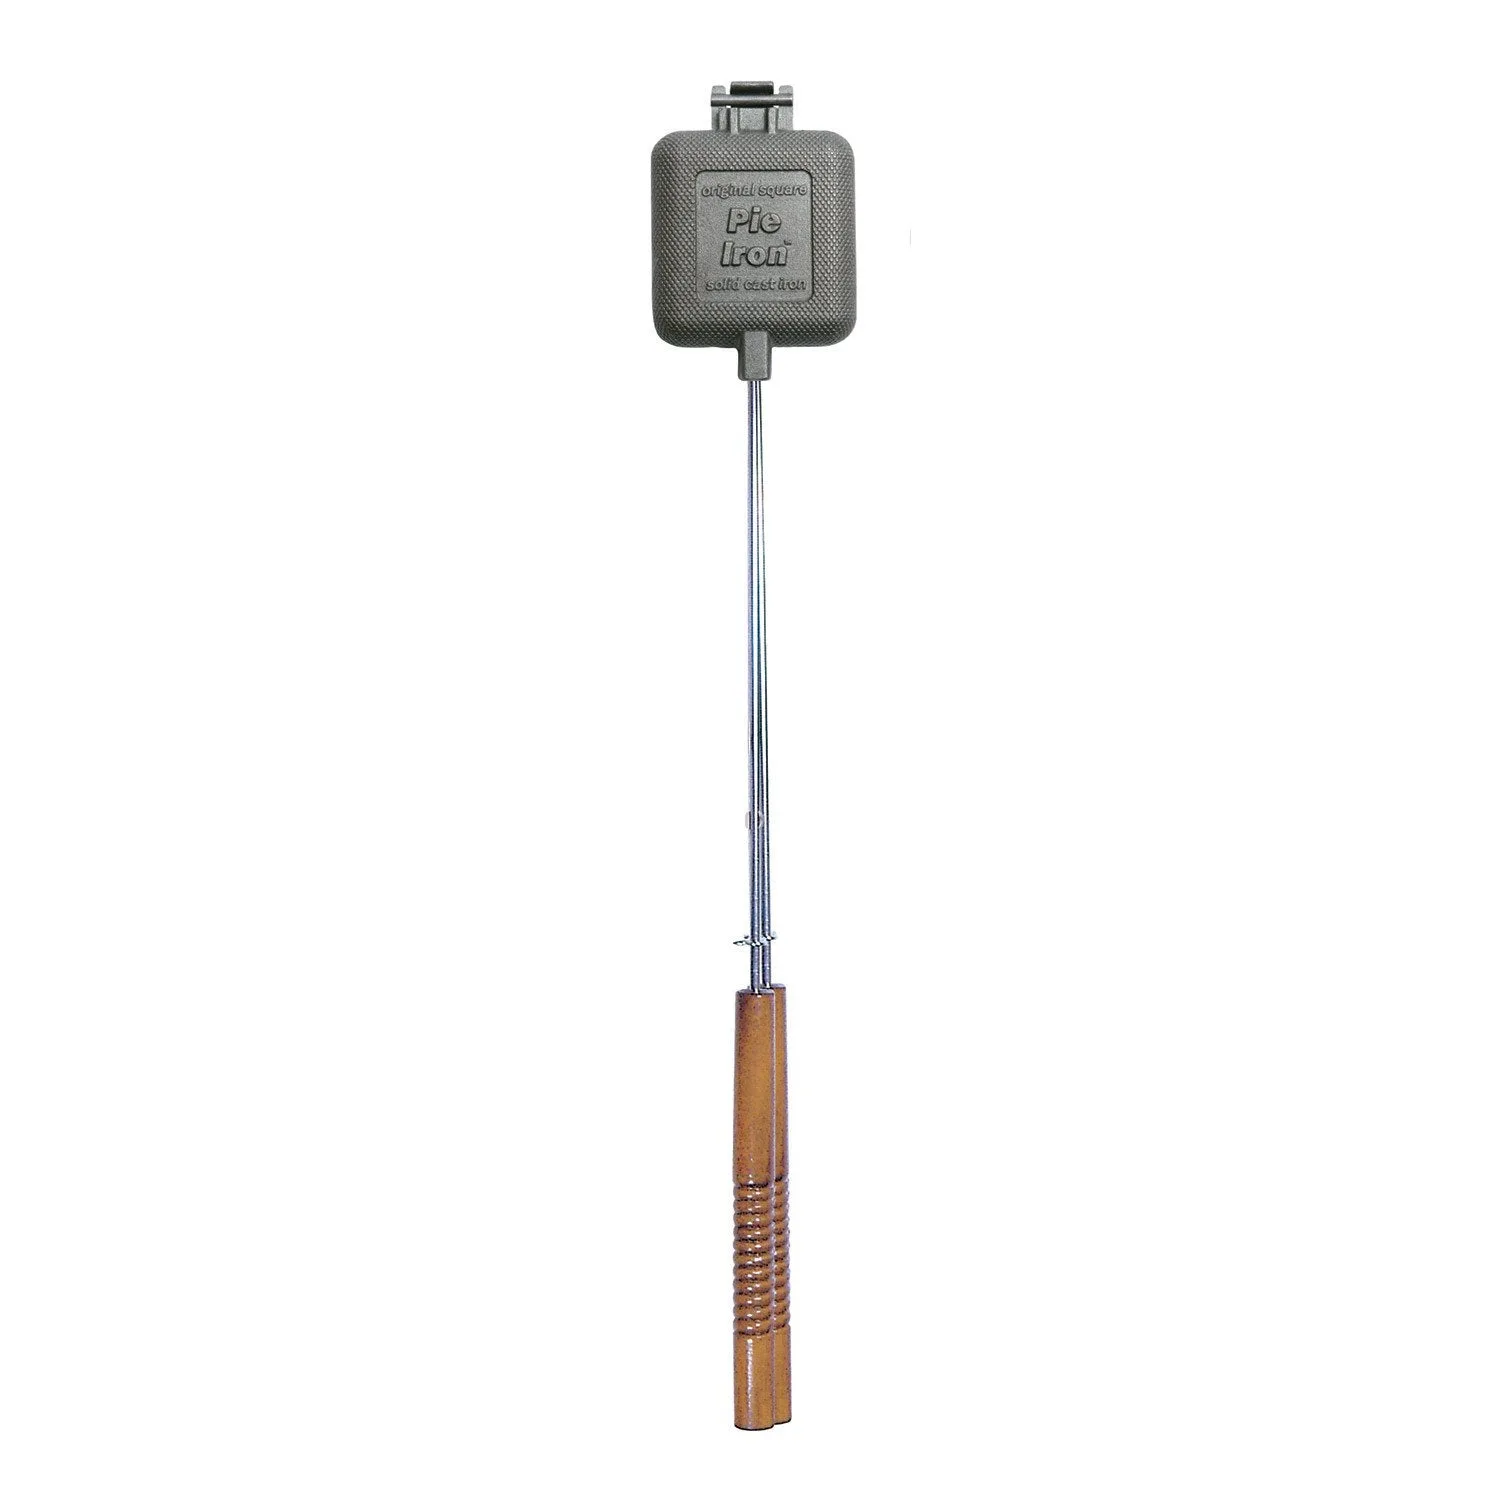
Rome’s #1705 is its original square pie iron, with a 4.25 x 4.5 in cast iron head on 28 in chrome-plated rods with wood handles. Rome has made pie irons since 1964 and gives a 10-year warranty on the cast iron, though rust from poor seasoning isn’t covered. It isn’t pre-seasoned, so burn off the wax and season it first. The head makes one sandwich at a time, and the wood handles have to stay out of the flames.
Rome Industries 1705 Square Cast Iron Pie Iron
Rome's original square cast iron pie iron, with a 4.25 x 4.5-inch head on 28-inch chrome-plated rods with wood handles, for toasted sandwiches and hand pies over fire pit coals.
What we like
- Rome's original square design, made since 1964
- Cast iron head toasts sandwiches and hand pies
- 28 in rods keep your hands back from the fire
- 10-year warranty on the cast iron, per Rome
Worth noting
- Not pre-seasoned; burn off the wax and season it first
- Small head makes one sandwich at a time
- Wood handles must stay out of the flames
Roasting Sticks: MalloMe 32 in, 5 Pack
This five-pack of telescoping two-prong forks extends to about 32 inches, with colored wooden handles so every kid gets their own, and a canvas pouch. The forks are 18/8 stainless steel, per the listing. They’re for marshmallows, hot dogs and our crescent rolls, not heavy sausages or corn, and some owners say they wobble fully extended. The metal gets hot end to end, so supervise kids.
Tongs and Skewers
Any long (16 in or longer) locking tongs will do for turning food, oiling the grate and moving foil packets. Use a poker or fire tongs, not your cooking tongs, for logs and coals. For kebabs, long flat metal skewers are all you need.
Fire Pit Recipes
Everyone knows how to make the basics over a fire pit, including marshmallows and hotdogs. But there are tons of different recipes available that people can try, here are a few fun fire pit cooking ideas.
Cinnamon Crescent Rolls on a Stick
First, it is possible to make cinnamon rolls on a stick. All you need is a tube of refrigerated crescent roll dough, cinnamon, and sugar. The dough is sticky and will wrap around a roasting stick or skewer. Roll it in a mix of cinnamon and sugar and hold it over the coals for a few minutes. As you’re cooking, be sure to regularly rotate the stick to ensure an even cooking process on all sides.
Banana S’Mores Dip
Another fun option is a banana s’more. It is a bit different than a traditional s’more, but it has all the elements.
Take a banana, slice open the skin, and make horizontal cuts in the flesh of the fruit. Then fill those spaces with marshmallows, chocolate, caramel, peanut butter, or Nutella, or anything else that strikes your fancy. Then set the banana on the grill until everything melts.
It can all be scooped out with graham crackers, making it a dip of sorts.
Pie Iron Pizza Pockets
Butter the outside of two slices of bread and lay one, butter side down, in an open pie iron. Add a spoonful of pizza sauce, a handful of shredded mozzarella and a few slices of pepperoni, then top with the second slice, butter side up. Close and latch the iron, trim any bread that sticks out, and hold it over the coals, turning every minute or two. Peek often, and pull it when both sides are golden and the cheese has melted.
Swap the filling for pie filling or sliced fruit with a sprinkle of sugar, and you’ve got a hand pie for dessert.
Fire Pit Chili
Finally, chilis are super easy with a fire pit. You’ll want a cast iron Dutch oven (a deep skillet works in a pinch) and a fire pit grate or a flat bed of coals. Cast iron handles the heat of a fire pit well, but every part of the pot gets very hot, so keep your gloves on.
Brown any ground meat in the pot first, until it reaches 160°F, then add the rest of the ingredients for a stew or chili. Set the pot over the cooler side of the coals so it simmers rather than scorches, and stir every so often. Taste, adjust the seasoning, and when everything is hot through, dinner’s ready!
Food Safety
Fire pit cooking is uneven by nature, so color and cooking time aren’t reliable signs that meat is done. Use a food thermometer and the USDA’s safe minimum internal temperatures:
| Food | Safe minimum internal temperature |
|---|---|
| Beef, pork, lamb and veal steaks, chops and roasts (whole cuts) | 145°F, then rest at least 3 minutes |
| Ground meat (beef, pork, lamb, veal) | 160°F |
| Poultry, whole or ground | 165°F |
| Fish and shellfish | 145°F (no rest needed) |
To check, pull the food to the cool side or off the grate, then probe the thickest part. Keep raw meat and cooked food on separate plates, with separate tongs.
What Not to Do
Fire pit cooking is easy, but it’s easy to make mistakes when cooking with a system you don’t use so frequently.
The following things should never be done.
- Don’t stick your hands in the pit while there is still a fire, or while the ashes or charcoal are hot. This includes not touching the stones that form the pit, the grill grate, or the outside of a metal fire pit, unless you’re wearing heat gloves, and then only briefly.
- Never put foil directly into the flames.
- Never use gasoline or another accelerant to start or revive a fire. Smokey Bear’s campfire guidance says never to use flammable liquids. Skip lighter fluid near food, too.
- Never burn treated, painted or pallet wood in a cooking fire.
- Never cook over a gas fire pit, fire glass or lava rock unless the maker says the unit is for cooking.
- Never cook on galvanized metal, on a grate its maker doesn’t rate for cooking over open flame, or on a surface you’ve painted yourself.
- Never cook on a tabletop or ethanol fire pit.
- Never leave the fire unattended, and keep kids and pets back.
- Always check meat with a thermometer to make sure it’s done before eating.
After You Cook
Put the fire out completely before you head inside. Let it burn down, then follow your maker’s and local fire service’s guidance to put it out. For most wood pits, that means Smokey Bear’s drown, stir and feel method: drown the coals with water, stir the ashes, and drown them again until you can hold the back of your hand near them and feel no heat. A lid is not a way to put a fire out. Solo Stove says its lid goes on a pit that has cooled.
Once the ashes are cold, scoop them into a metal can with a lid, and keep it at least 10 feet from the house and anything that can burn, as the U.S. Fire Administration advises.
Then look after your cookware:
- Grates: scrape them clean while they’re still warm (with gloves), let them cool, and store them dry.
- Cast iron: let it cool, scrape it out, rinse with water if you need to, dry it completely, and wipe on a thin coat of oil before you put it away.
- Firewood: keep what’s left dry and off the ground, so it’s ready for next time. Our firewood rack guide can help.
Frequently Asked Questions
Can you cook on any fire pit?
No. Wood-burning steel, cast iron and stone fire pits are fine with a grate or cast iron. Gas and propane pits, fire tables and anything with fire glass or lava rock generally aren’t for food, so never cook over them unless the maker says the unit is for cooking. Never cook on a tabletop or ethanol fire pit.
How long should a fire burn before you cook on it?
About 30–60 minutes, according to Breeo, until the flames die down and the wood has broken into glowing coals. Gardeningetc puts it at about 45 minutes. Cook over glowing coals, not live yellow flame.
How high should a grate be above the coals?
As a rule of thumb, about 4–6 inches for searing and around 10–12 inches for slower cooking. If your grate has fixed legs or sits on the rim, change the heat by piling coals deeper or spreading them thinner instead. To choose a grate, see our guide to fire pit grates for cooking.
Can you use charcoal in a fire pit?
Usually yes, in a steel, cast iron or stone wood-burning pit, but check your manual, because some makers limit it. Use natural lump charcoal and light it with a chimney starter or kindling, not lighter fluid or self-lighting briquettes. Never put charcoal in a gas or propane fire pit.
What’s the best wood for cooking over a fire pit?
Seasoned hardwoods such as oak, hickory, maple and fruitwoods, dried to under about 20% moisture. Avoid pine and other resinous softwoods, and never burn treated, painted or pallet wood. Save piñon for a fire after dinner.
Can you cook on a propane or gas fire pit?
Generally no. Most gas and propane fire pits are built for heat and ambience, and drips and grease can foul the burner and the fire glass. Never cook over fire glass, lava rock or a gas burner unless the maker says the unit is for cooking, so check your manual first.
Is it safe to cook over a copper fire pit?
Yes, if food never touches the copper. Burn wood in the bowl and cook on a steel grate or in cast iron set above the fire. That applies to solid copper bowls and copper-look (painted or finished steel) bowls alike. Our copper fire pits guide explains the difference.
Conclusion
These basics and sample recipes can help you learn how to cook on a fire pit. Wait for the coals, set up a hot side and a cool side, and keep a thermometer handy. Remember, humans have been cooking over a fire for millennia, and there are plenty of new ways to make the favorite foods of any campers or visitors over the fire. Enjoy, and try some of our recommendations for fire pit cooking!
Previously recommended
- Texsport Heavy Duty Barbecue Swivel Grill: discontinued by Texsport, and current listings come from third-party sellers. Our fire pit grates guide covers current stake and fold-leg grates.